
How to Smoke Fish on a Charcoal Grill . Did you know that maintaining a grill temperature between 200 and 225 degrees Fahrenheit is crucial for perfect smoked fish1? This method ensures the flavor is rich and the texture is just right. Smoking fish at home is an art that combines the right equipment, precise heat, and patience.
Using a charcoal grill with the right wood chips can transform a simple fillet into a gourmet dish. Whether it’s salmon or trout, the process involves brining, air-drying, and carefully monitoring the time and temperature1.
This guide will walk you through every step, from selecting the best fish to achieving that smoky, delicious result. With the right recipe and technique, you can create a dish that’s sure to impress.
Key Takeaways
- Maintain grill temperature between 200-225°F for optimal results.
- Brining enhances flavor and texture, especially for high-fat fish like salmon.
- Use the right wood chips to add a unique smoky flavor.
- Monitor internal temperature to ensure fish is fully cooked.
- Proper air-drying forms a pellicle, improving smoke absorption.
Introduction to Smoking Fish at Home
Smoking fish at home is easier than you might think. With just a charcoal grill and a few basic tools, anyone can achieve delicious results. This method doesn’t require bulky or expensive equipment, making it accessible for beginners and seasoned cooks alike.
Natural hardwood smoke adds a rich, traditional flavor to the fish. Whether it’s salmon, trout, or another variety, the process works well for all types. Simple techniques like brining and air-drying ensure the fish absorbs the smoky essence perfectly2.
Preparation is key. Before lighting the grill, the fish should be brined to enhance its flavor and texture. After brining, air-drying forms a pellicle, which helps the smoke adhere better2. This step is crucial for achieving the best results.
Here’s a quick overview of the process:
| Step | Details |
|---|---|
| Brining | Soak fish in a saltwater solution for 15 minutes to 5 hours2. |
| Air-Drying | Let fish dry for at least 5 hours to form a pellicle2. |
| Smoking | Use wood chips for 1-2 hours to infuse flavor2. |
This guide will walk you through each stage, offering practical tips to make the process seamless. With a little patience and attention to detail, you can create a dish that’s both flavorful and impressive.
Materials and Equipment for Smoking Fish
Getting started with smoking requires the right materials and tools. Quality ingredients and equipment ensure both safety and flavor. From brining solutions to the perfect wood chips, every detail matters.
Essential Ingredients and Tools
Brining is a crucial step, and the right mixture enhances flavor and texture. A basic brine includes salt, sugar, and water. For example, a wet brine might use 1 quart of water, ½ cup of sea salt, and ¾ cup of brown sugar3.
Essential tools include a food-grade container for brining and soaking wood chips. Food-safe pliers are helpful for removing pin bones. A reliable meat thermometer ensures the internal temperature reaches 145°F for safe cooking4.
Choosing the Best Wood Chips and Charcoal
Wood chips add the signature smoky flavor. Popular choices include hickory, apple, and alder. Soaking chips for 30 minutes before use prevents them from burning too quickly3.
For charcoal, opt for high-quality briquettes. They provide consistent heat and are ideal for maintaining the 200-225°F range3. Pairing the right wood chips and charcoal ensures a balanced, rich flavor.
- Use a food-grade container for brining and soaking wood chips.
- Select wood chips like hickory or apple for optimal flavor.
- Choose high-quality charcoal briquettes for consistent heat.
With the right materials and tools, smoking becomes a seamless and rewarding process. Focus on quality to achieve the best results.
Preparing Your Fish: Brining and Drying
The secret to perfect smoked fish lies in the preparation process. Brining and air-drying are essential steps that ensure the fish absorbs smoke evenly and stays flavorful. These steps also enhance texture and safety, making them crucial for the best results.
Step-by-Step Brining Process
Start by mixing a brine solution. A wet brine typically uses a 20 to 1 water-to-salt ratio, with added sugar for balance5. For example, combine 1 quart of water, ½ cup of sea salt, and ¾ cup of brown sugar. This mixture enhances flavor and texture, especially for high-fat fish like salmon.
Submerge the fillet in the brine, ensuring it’s fully covered. For side fillets, remove pin bones using food-safe pliers. Brining time varies: smaller fish like trout may only need a few hours, while larger fillets benefit from an overnight soak5.
Air Drying and Forming the Pellicle
After brining, rinse the fish thoroughly to remove excess salt and sugar. Pat it dry with paper towels, then let it air-dry. This step forms a tacky layer called the pellicle on the skin, which helps smoke adhere evenly6.
Air-drying typically takes 5 hours or more, depending on humidity. The pellicle is crucial for achieving a rich, smoky flavor and even cooking. Proper preparation ensures the fish absorbs maximum flavor during the smoking process.
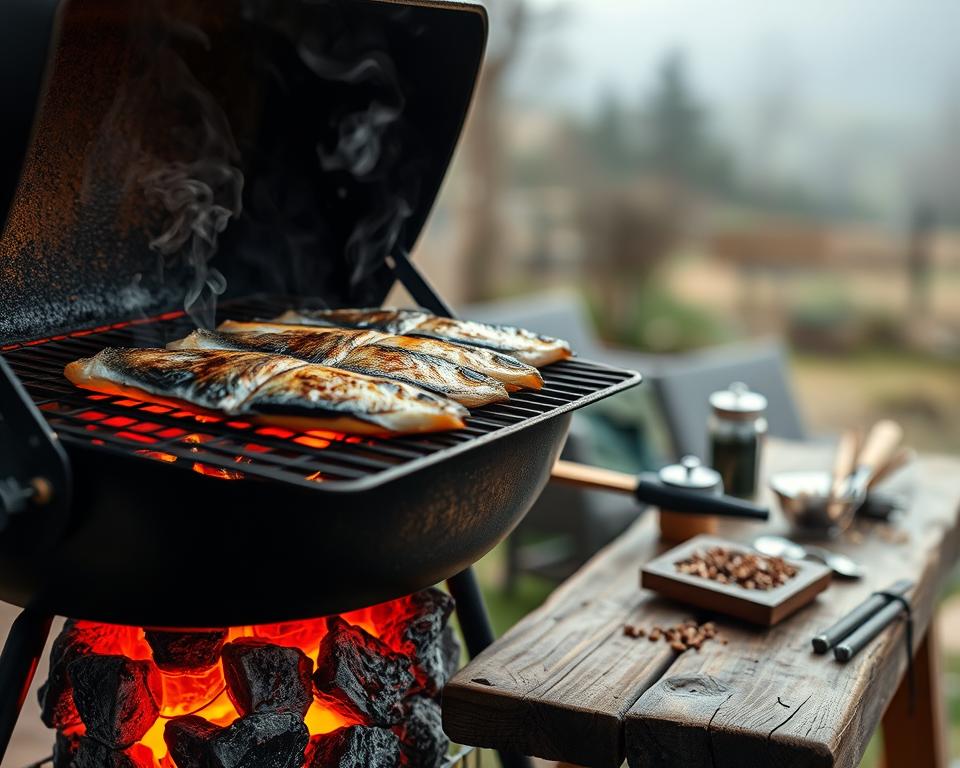
How to Smoke Fish on a Charcoal Grill
Achieving perfectly smoked results starts with mastering the indirect heat method on a charcoal grill. This technique ensures the fish cooks evenly without drying out. By placing the coals on one side and the fish on the other, the smoke circulates effectively, infusing rich flavor7.

Following a trusted recipe is key to success. Whether using salmon or another variety, the process remains consistent. Keep the fish away from direct heat to maintain moisture and tenderness. This approach works for both fillets and whole pieces, ensuring a delicious outcome every time7.
For optimal results, maintain a temperature of around 180°F. Smoking typically takes 3 to 4 hours, but even shorter durations can yield edible results. Checking the grill every 30-50 minutes ensures consistent heat and smoke levels7.
With the right technique and attention to detail, smoking becomes a rewarding culinary experience. The combination of indirect heat and proper placement guarantees a flavorful, tender dish that’s sure to impress.
Setting Up Your Charcoal Grill for Smoking
Setting up your grill correctly is the foundation for achieving perfectly smoked results. Proper preparation ensures consistent heat and optimal smoke infusion, which are essential for flavor and texture8.
Firing Up the Charcoal Correctly
Start by lighting the charcoal using a chimney starter. This method is efficient and avoids the need for lighter fluid, which can leave unwanted flavors9. Fill the chimney with briquettes, place crumpled newspaper underneath, and light it. The coals will be ready in about 15-20 minutes.
Using a chimney ensures even ignition and reduces the risk of flare-ups. Once the coals are glowing and covered with ash, they’re ready to be arranged in the grill10.
Arranging Coals and Wood Chips for Indirect Heat
For indirect heating, place the lit coals on one side of the grill. This setup keeps the fish away from direct flames, preventing it from drying out. Add a water pan on the opposite side to help regulate temperature and maintain moisture8.
Soak wood chips for at least 30 minutes before use. Scatter them over the coals to create steady smoke. Adjust the vent and lid to control airflow, keeping the temperature between 200-225°F for optimal results8.
| Step | Details |
|---|---|
| Light Charcoal | Use a chimney starter for even ignition9. |
| Arrange Coals | Place on one side for indirect heat8. |
| Add Wood Chips | Soak and scatter for steady smoke8. |
| Adjust Vents | Control airflow to maintain temperature8. |
With these steps, your grill will be ready for smoking. Proper setup ensures a flavorful and tender outcome every time.
Executing the Smoking Process
Mastering the smoking process involves precise placement and careful monitoring. Proper arrangement of the fish on the grill ensures even smoke distribution and consistent flavor. This step is crucial for achieving the best results.

How to Smoke Fish on a Charcoal Grill
Placing Fish for Even Smoke Distribution
To ensure uniform flavor, place the fish on the side of the grill opposite the coal. This indirect heat method prevents drying and allows smoke to circulate evenly. For larger pieces, consider using a wire rack to keep them elevated11.
Positioning is key. Avoid overcrowding the grill, as this can block smoke flow. Leave space between pieces to ensure each one absorbs the smoky essence fully12.
Timing and Temperature Guidelines
Maintaining the right temperature is essential. Aim for a range of 140°F to 150°F during the initial smoking phase, then increase to 175°F for the final stage11. This gradual approach ensures the fish cooks thoroughly without losing moisture.
Check the grill every 30-50 minutes to monitor heat levels. Use a meat thermometer to confirm the internal temperature reaches 130°F to 140°F11. This ensures safety and optimal texture.
| Step | Details |
|---|---|
| Initial Smoking | 140°F to 150°F for up to 1 hour11. |
| Final Smoking | 175°F for 1 to 2 hours11. |
| Internal Temperature | 130°F to 140°F for safety11. |
Following these guidelines ensures a flavorful and tender outcome. Adjustments may be needed based on the type fish being smoked, but the process remains consistent13.
Monitoring Temperature and Smoke Levels
Keeping an eye on the temperature and smoke levels is essential for achieving perfectly smoked results. Consistent monitoring ensures the fish cooks evenly and absorbs the right amount of flavor. A meat thermometer is a must-have tool to check the internal temperature, which should reach 145°F for safety14.
Adjusting the grill’s vents plays a key role in controlling smoke output. For low and slow smoking, keep the bottom vents slightly open while mostly closing the lid vent15. This setup restricts airflow, maintaining a steady temperature between 200-225°F16.
When smoke begins to wane, reload wood chips or coals. Soaking wood chips for 30 minutes before use prevents them from burning too quickly14. Adding unlit charcoal briquettes can also help lower the overall temperature if needed15.
Small adjustments, like slightly opening or closing the lid, can make a big difference. Consistent monitoring ensures a predictable and delicious outcome. With attention to detail, the smoking process becomes a rewarding culinary experience.
How to Smoke Fish on a Charcoal Grill
Troubleshooting and Enhancing Flavor
Perfecting the art of smoking requires attention to detail and a willingness to troubleshoot. Common challenges like overly salty results or uneven smoke distribution can be easily corrected with a few adjustments. For example, if the flavor is too intense, reduce the salt in the brine or shorten the soaking time17.
Experimenting with brine variations can significantly improve the final taste. Adding herbs, spices, or citrus zest to the mixture introduces new layers of flavor. For a milder taste, try using apple or cherry wood chips, which complement the natural richness of the type fish18.
If the smoke fish process starts to falter, small tweaks can make a big difference. Adjust the grill’s vents to control airflow or add a fresh batch of wood chips to maintain consistent smoke levels19. Keeping a record of each session helps refine the process over time.
| Issue | Solution |
|---|---|
| Overly Salty Fish | Reduce salt in brine or shorten soaking time17. |
| Uneven Smoke | Adjust vent settings or add fresh wood chips19. |
| Temperature Fluctuations | Reorganize coals or add a water pan18. |
| Weak Flavor | Experiment with brine variations or stronger wood types18. |
Small adjustments in the cooking process can lead to significant improvements. Whether it’s tweaking the brine or fine-tuning the grill setup, these changes ensure a delicious outcome every time. With practice, the way you approach smoking will become second nature.
How to Smoke Fish on a Charcoal Grill
Adapting the Process for Different Types of Fish
Adapting the smoking process for various types of fish ensures optimal flavor and texture. Fatty varieties like salmon absorb smoky flavors more effectively, while leaner options like tilapia require extra care to prevent drying out20. Understanding these differences helps achieve the best results.
Considerations for Fatty vs. Lean Fish
Fatty fish, such as salmon and mackerel, are ideal for smoking due to their high oil content. This natural fat helps retain moisture and enhances flavor absorption20. Leaner fish, like cod or halibut, benefit from shorter smoking times and careful monitoring to avoid overcooking.
Thicker fillet cuts, often measured by the pound, may require extended smoking periods. For example, a 1-inch thick piece typically needs 1-2 hours, while thinner cuts cook faster21. Adjusting the setup, such as container placement and vent settings, ensures even cooking for all sizes.
Brine recipes also play a role. A mixture of sugar, salt, and water enhances flavor and texture. For lean fish, a milder brine prevents overpowering the natural taste20. Experimenting with cold-smoked techniques can also yield unique results, especially for delicate varieties.
| Fish Type | Smoking Time | Brine Recommendation |
|---|---|---|
| Salmon | 1-2 hours | Strong brine with sugar and salt20 |
| Tilapia | 45 minutes – 1 hour | Milder brine to preserve texture21 |
| Cod | 1-1.5 hours | Balanced brine for even flavor20 |
Preserving the natural skin and texture is essential. Proper preparation, including brining and air-drying, ensures the fish absorbs smoke evenly. With these adjustments, every type fish can be transformed into a flavorful, tender dish.
How to Smoke Fish on a Charcoal Grill
Conclusion
Creating smoked fish at home is a rewarding process that combines preparation, patience, and precision. From brining to air-drying, each step ensures the fish absorbs rich, smoky flavors. Maintaining the right temperature and using quality wood chips are key to achieving mouthwatering results22.
This method is versatile, perfect for making smoked salmon or other varieties. Whether hot or cold-smoked, the process can be adapted to suit different tastes. Proper storage in an airtight pan or container keeps the fish fresh for up to a week23.
With practice and attention to detail, anyone can master this technique. Use the provided recipe and troubleshooting tips to refine your skills. Enjoy your homemade smoked fish at any meal or gathering, knowing it’s crafted with care and expertise.


Leave a Reply